Do you love origami? How about making cool and fierce origami claws? In this step-by-step guide, I will show you how to make origami claws that are perfect for any occasion! Whether you’re looking for a Halloween costume idea or just want to have some fun, these origami claws are sure to impress and provide you with endless fun! Let’s get started!
How to Make Origami Claws Video Walkthrough
There you have it! That video should have made it easy enough for you to create your first origami finger claws! You can make them any color you want as well as add some decorations to them! Maybe draw some cool designs all over the claws and really make them unique to you! This design is relatively easy to make and you should be able to knock out two hands worth of claws in no time! If you like learning a different way other than through a video then I’ve also made a step-by-step illustrated guide on how to make origami claws down below!
How to Make Origami Claws Step-By-Step Instructions
1. Creating the Initial Crease

Start with a square piece of paper and fold it in half diagonally, making sure to align the corners precisely. Press the fold firmly, and then unfold the paper, revealing a central crease.
2. Folding Edges Towards the Center

Carefully fold the two side edges of the triangle towards the center, aligning them with the central crease. Follow the dotted lines in the reference image for guidance. Press the folds firmly.
3. Folding the Paper in Half
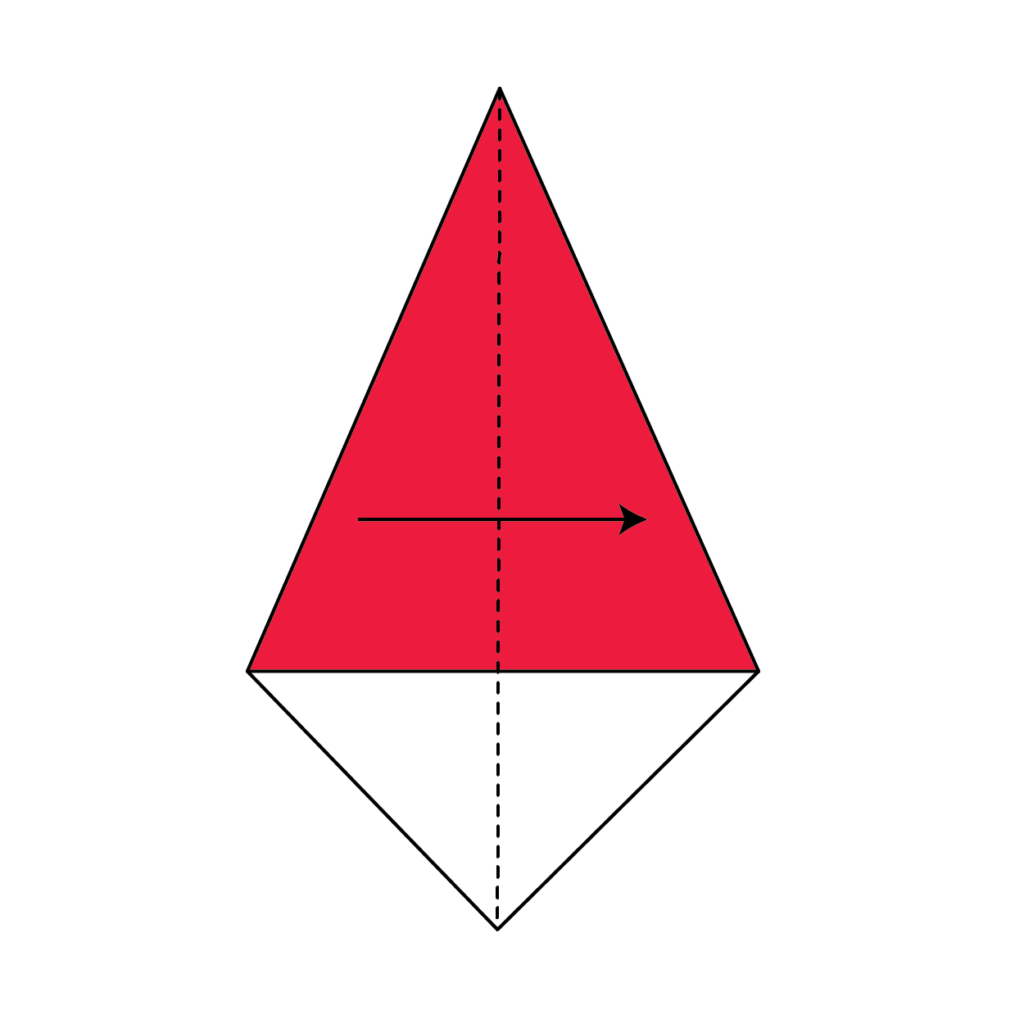
Now, fold the paper in half along the dotted line, making sure that the newly created edges remain aligned with the central crease. Press the fold firmly.
4. Folding the Top Layer

With the paper folded in half, take only the top layer of the paper and fold it along the dotted line indicated in the reference image. Press the fold firmly.
5. Wrapping the Corner Around

Grab the tip of the corner you just folded, and gently wrap it back and around the body of the paper, following the curvature of the folded shape.
6. Bringing the Corner Towards the Center

Take the corner you just wrapped and fold it towards the center of the paper, following the guidance provided in the reference image.
7. Tucking the Corner into the Pocket

Carefully fold the corner into the pocket that has been created by the previous folds. Make sure it is snugly tucked in and press the fold firmly.
8. Opening the Origami Claw

To open the origami claw, hold the base of the folded shape and gently pull the tucked-in corner outward, being cautious not to tear the paper.
9. Admiring Your Completed Origami Claw

Congratulations! You have successfully completed your origami claw. Take a moment to appreciate your handiwork and consider making more claws to create an impressive collection.
There you go! You should now be getting a lot better at making these origami claws! You have both video instructions and illustrated instructions at your disposal! Just keep practicing them and you should be able to memorize these steps relatively easily. Down below you’ll find the same step-by-step instructions but in a downloadable and printable format.
How to Make Origami Claws Printable Instructions
So there you have it! My easy step-by-step guide to making origami claws. I hope you enjoyed this tutorial and will be inspired to try out more origami creations of your own. Be sure to check out my other tutorials and keep learning the art of origami. Until next time, happy folding!


